How to Dye Book Pages
When I was planning all of the book page flowers for my daughter’s wedding, I knew I wanted them to look real. I had a very limited experience with making paper flowers. I’d made roses, which was a start, but I wanted a variety.
I poured over Pinterest, searching, “book page flowers” and “book theme wedding”. Y’all….there are so many gorgeous ideas! But I never really saw what I was looking for, realistic looking book page bouquets, muted colors, simple but stunning. So finally I decided to just come up with my own.
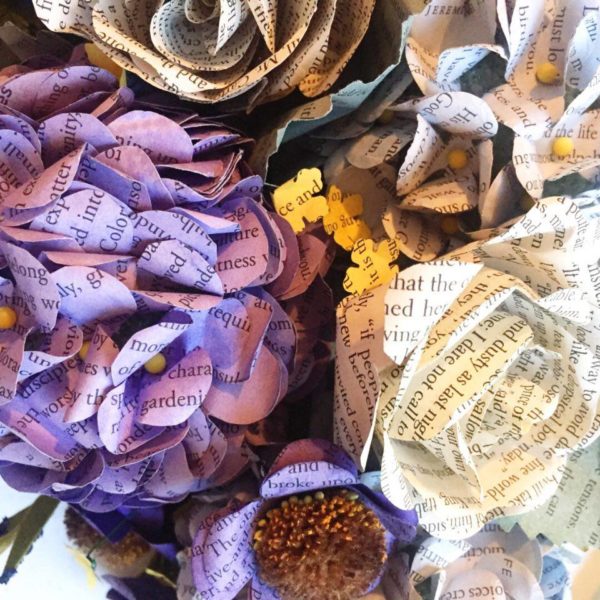
I knew I wanted roses and hydrangeas as the main flowers with some smaller flowers to fill it in. My challenge was how to get a variety of colors. I tried a bunch of things. I rubbed the book pages with stamp pads, brushed with watered down paint, different spray techniques. Nothing looked the way I wanted. Finally I thought, “What if I just dyed them like fabric?” And voila! It worked beautifully!
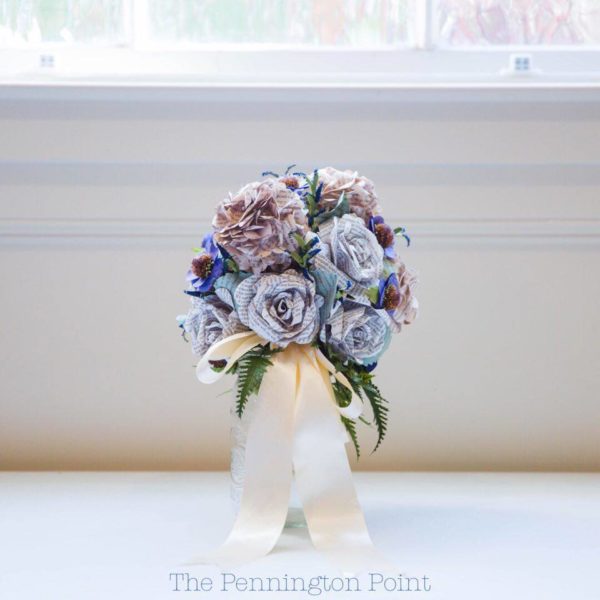
The only part of the bouquet not made of book pages is the dark green. I used faux plants from the craft store for that. Frankly, I just ran out of time, so I decided it would be OK if I bought those.
Before I go into how, let’s talk about the dye for a minute. I used Rit Dye. Yep, just got it at the craft store or the super center. I found that the dye made for synthetic fabrics gave brighter colors, so I used a mix of both natural and synthetic dye. The little yellow flowers we made were made with the synthetic, which made them nice and bright. I wanted that so all of the flowers weren’t the same tone and didn’t blend together. Even if you’re going for muted, which I was, you want some colors to pop more.
You can blend your dye colors too. I mixed tan and camel to get the color I wanted for the hydrangeas in the bride’s bouquet. Rit has color chart pages to follow that were very helpful! I used the liquid dye, but I think the powder would be just as successful.
For my purple flowers I used Hyacinth + Purple. I wanted them to all be slightly different (like in nature), so I used different amounts of dye with each batch. Tan+ Camel made the beige flowers. Lemon Yellow + Dark Green for the leaves. Daffodil Yellow in the synthetic dye for the tiny yellow flowers. You’ll notice I’m not going you specific measurements because I kind of just poured in a little…made a page, if I liked it I kept going, if not I added more dye.
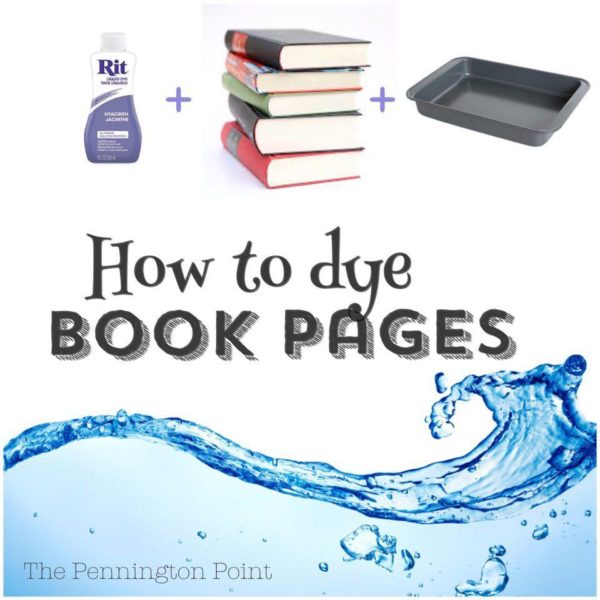
Here’s how to dye book page paper:
You need Rit Dye in the colors you want, a container (I used an old 9X13 pan), warm water, book pages, 2 spoons (or metal tongs), foil and paper towels. You also might want an iron, but it’s optional.
- Fill the pan about 1/3 full with warm water.
- Add your dye. Try going light at first with just a tablespoon or so. You can put the pages in again with more dye if you don’t like the shade.
- Put the book pages into the dye. Just rip them out of the book, no need for neatness. Be sure you add them to the dye one page at a time. If you do them in bunches some of them won’t get the dye on them in the center. Ask me how I know.
- Leave them for a while, go do something fun for 30 minutes to an hour and try not to think about all of the flowers you have to make.
- Spread foil out on a flat surface and add 2 layers of paper towels on top of that. Make sure the paper towels aren’t hanging off the edge of the foil anywhere. It will bleed over the edge and get dye on your countertop. Learn from my experience (and the purple spot on my kitchen counter).
- Using 2 spoons or tongs, remove the paper from the dye bath one page at a time. Don’t use your fingers, they will dye too. Let the pages drip over the pan for a sec then lie them flat on the paper towels. You can stack the pages, they don’t need to be a single layer, but just don’t stack them too thick.
- Let them dry for another half hour. Play with your kids. Clean the kitchen. Enjoy your life.
- Once they are about half dry, if you’re in a hurry (which I generally am), you can put them in the microwave for 30-60 seconds to finish drying them. Just put them on a fresh paper towel in the microwave. You don’t need the foil for that part…it was just to keep the dye from getting on your countertop or table.
- Once they’re dry you can iron them if you want them nice and stiff and flat. It made them easier to work with. A 10 year old can dry and iron, so it’s a good time to use your child labor. 😉
- Now your colored book pages are ready to use!
It’s s simple really. Getting the colors I wanted took a little experimenting, but you can just dye one page and see how it looks. Once I found a color I liked, I just made stacks of pagess and started making flowers. If we needed more, we dyed more.
One more tip to leave you with….don’t use the 9×13 pan for cooking after you’ve used it to dye paper. It could lead to your tater tot casserole turning slightly purple and you have to dump it out and the kids are upset because they really love tater tot casserole so you have to order pizza to make up for your mistake. Guess how I know.
Be sure to check out my original post with pictures of all of the flowers and all of my video tutorials showing how I made each flower!
Video: How I made the pink peonies for the reception centerpieces
Video: How to Make Book Page Hydrangeas
Video: How to Make 5-Petal Flowers with Book Pages
Video: How to Make Book Page Poppies
Video: How to Make Tiny, Baby’s Breath Type Flowers with Book Pages
Blog Post: Beautiful Book Page Flowers!
Blog Post: How to Make and Use a Wedding Budget