The New Room Reveal!
It was two weeks ago today that we started the new room. But we only worked on the room 7 of those days. The rest of the time we lived normal lives. OK, normal may be a stretch.
Before I show you the results, here’s a reminder of what the front porch looked like 2 Saturdays ago:

And here it is today:

A closer look before:

After:

And remember the mess?
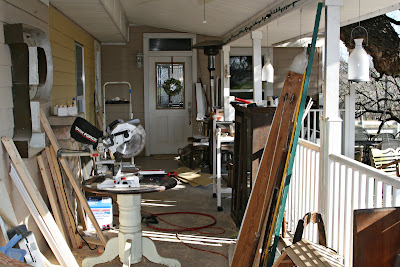
Gone.

Now, come on inside….
This is what the boys’ room looked like before:

And today:

Here’s the new room!

To take this next picture I was standing in the dining room. The door into the new room is the original front door on the house.

Because it opens to our living areas, I had to find a balance between fitting with my style, yet keeping it masculine and an obvious room for an 11 year old boy.
So I kept the colors similar with the rest of the house, whites with green walls and I added a touch of black. Although this green is not the same color I used in the living areas. I thought a darker, deeper green was better for a boy’s room.
This is the wall on the left as you walk in:

I hung a framed chalkboard and wrote his morning chores there. Check out chore number 8. That’s the most important one.

If you’re wondering about the big, white thing on the wall over the bed….that’s a giant paper airplane. This boy loves to make paper airplanes. I gave him a huge piece of paper and had him make it. I thought it was a good compromise of my taste (whites, clean lines and a little whimsical with a touch of vintage) with his personality.

Besides needing a bed for him, we needed storage for our enormous Lego collection. I used several different types of containers and labeled them. I told the kids to sort the Legos into the containers and make me a list of what the labels should say. I think it’s funny that it looks so cute, but the labels say things like, “Weapons”.

I used vinyl in my die cut machine to make the geometric shapes on the striped wall. To me it gives the room a modern, whimsical look, but it’s maintenance free. Great for a kid.

These picture show the texture I did on the walls. It looks a little bit like linen. I really like it. And I made it up all by myself. But before you admire my creativity you should know, it was mostly born of laziness because I didn’t want to go to the trouble of renting a machine and cleaning it up afterward.

The shelves needed something to soften the look. I came up with the idea of making giant Legos and covering them with vintage math papers. I’m working on a tutorial to show you how to make them, if you’re interested in having huge, paper covered Legos in your house. Which I’m sure you are. I mean, who doesn’t need that?
The wall to the right is the old exterior wall of the house. It is stucco. 80 year old, hard as a rock stucco. I probably could have drilled into it with a masonry bit and used wall anchors to hang pictures. But I move things around so much, that I didn’t want to be limited by that. So instead, I hung eye hooks from the ceiling and used chain from the hardwork store and that is what holds the wall decor. I love the texture that the chain adds to the room.
The picture is of our five boys. My photographer friend took it for me. I wasn’t sure what I would do with it, so I just bought the image file from her. I used my MCP actions to change it to black and white with just a touch of blue. Then I had it made into a 20×30. I just used a poster frame with plastic instead of glass. That way we don’t have to worry about it being bumped into and breaking.

Down that same wall, past the doorway to the other boy’s room, there’s a tiny corner. I put a little dresser there that I had already painted white. The mirror is from IKEA. It adds to the geometric shape thing that’s going on in the room. Again, it’s hung with chains.

A closer look shows a framed report that my dad wrote when he was 12. It’s all about where he lived and what he liked to do. It’s one of my favorite possessions.

I got the bed frame at IKEA. It’s just black with white legs. Very simple. But the box spring was going to show and I didn’t want a dust ruffle. So I bought this fabulous fabric at our local quilt store and stapled it to the box spring. I am thrilled with the way it turned out.

Before I wrap up this ridiculously long reveal, I thought you might want to know a few of the nitty gritty details.
The room is about 12 feet by 6 feet. Very small and hard to photograph.
It cost just under $1,000. But keep in mind that is including everything. From the nails, sheetrock and Hardy Plank to the curtains, pillows and mirror. The only thing we didn’t have to buy was the flooring. We had just enough leftover from last year’s project of installing it in the other three bedrooms.
As for time, you already know it took 7 days. But each of those days were WHOLE days….sun up to sun down. If it hadn’t been for the front porch mess I might have let it last a little longer so I wouldn’t be so worn out from it.
My only regret is the black rug I bought to put by his bed. It shows every little speck of dirt. I got it on clearance, so when I find something else I will get rid of it. But I just hate wasting money.
So that’s it. I hope you enjoyed my little project. Keep checking back. I’ve got plenty more of them swimming around in my mind just waiting to get started!

For a full review check these out…
Day One: The Beginning
Day Two: Sheetrock
Day Three: Mom with Power Tools
Day Four: Texture and Trim
Day Five: Paint and Floor
Day Six: Starting to Lose my Mind
Day Seven: The Details are Going to Break Me
OH, my stinkin' goodness. You really are very, very talented. If only I could afford to hire you to do my entire home.
Seriously… beautiful!
Amazing!! I love it!!!!
Especially the lego containers….hilarious!
What a wonderful room for a little boy. How blessed he is! It shows so much creativity. Good job! CR
This room is awesome! Love the way you’ve organized the legos, given him a great boy’s room and stayed true to your vintage homey style. I really admire your creativity, Lisa!
God Bless you and your family.
This wall is going in my inspiration file! Thank you, thank you, thank you. My middle son is a Lego Maniac and sometimes I feel like they’re taking over the house. We have an insane amount of legos. It doesn’t help that my husband has a lego collection of his own. This wall of shelves dedicated to legos is a dream…and you my friend, are a genius! Now if I can only convinve my hubby to build it, we’ll be good to go.
~Amanda
.-= Amanda@ImperfectlyBeautiful´s last blog ..Out With the Dark…In With with the Light =-.
Oh my goodness — you are amazing!!!!!! I just discovered your blog via Met Monday, and am so inspired. I, too, am a homeschooling mama — and am awed by all that you accomplish in your home!
BTW — covering the boxspring with a fun fabric is just BRILLIANT!
Paula/xinme
http://created2bcreative.blogspot.com/
.-= xinme´s last blog ..Crusts to Croutons and Other Kitchen Creations =-.
This is awesome. I love what you did with the space. Where is the new front door??? I think your solutions to things were genius. I love how you covered the box spring and hung up your pictures and mirrors. The shelves are awesome. You really do have a lot of legoes!!! Great, great job!
Lisa, I’ve looked at this before, but now it resonated with me because my and I turned an 8×6 storage room into a play room for my girls this summer. In the backs of our minds we are turning it into a bedroom for the boy (years from now, of course). When that time comes, I’ll have to revisit your ideas here.
Hi Meg, I am a newbie to your site and I love it. At first I was drawn to it from another site about left over wood. I collect pallets, then I read your faith blog. I too am a big fan of ” Jesus Calling ” by Sarah Young. You are so right about he is the one that gives us wisdom. If people only realize that He can make you for what he design you for. Just
like you and his followers I have a passion to turn something in something repurpose , reclaim, redeemed. 🙂 by the way I love the room . Every thing balance a d using white in a small space really makes the room not look so small. Also great ideal to have your child do the paper plane, so he can have his say so in it, lol. Anyway keep up the good work. Praying for your family. Karen Smith
Don’t need to go look at my blog as it’s still in process. I loved the idea of covering the box spring with decorative fabric instead of a dust ruffle. This is so much easier to go around corners with a full bed frame. We have a Tempurpedic so it would be perfect for the box that is the base. Thanks so much for your creativity.